Online help | CNC Syntax Editor
About software
These days, digital technologies are coming into use in almost every area of our life. High precision of machine-controlled operations coupled with extended overall reliability ensure optimum result. Almost everything from photos to financial reports becomes digital.
However, some areas of process automation are somewhat neglected. Despite the fact, numeric control devices are an older technology than digital photography,
there are not enough quality software solutions allowing NC editing.
I bet, you can easily name several all-inclusive photo editing tools, while it is really a problem to find good low-cost CNC editing software. Will the situation ever change?
It has already! Introducing CNC Syntax Editor by AGG Software, the unique feature-packed NC editing software, allowing full control over your program file.
CNC Syntax Editor operates as a multiple windows NC programming environment allowing for edit, change, upload and download programs to numerically controlled
device. The application is capable of all types of ASCII CNC files and G codes, ensuring optimum performance even on those larger files.
CNC Syntax Editor can highlight a program syntax: commands, coordinates etc, visually splits commads and coordinates into groups, that help you to develop NC programs. Due to highly configurable options it is possible to set CNC Syntax Editor up the way which suits best for your editor needs.
Another great feature of CNC Syntax Editor is the set of built-in tools. Thanks to set it is possible to mirror you coordinates, shift or scale axes value, switch axes etc.
CNC Syntax Editor is a tool for writing and editingof Computer Numerical Control (CNC) programs. It has a comfortable and intuitive interface both for beginners and advanced programmers. CNC Syntax Editor is deceptively simple, but it is really a very powerful tool. The size and number of documents open at any one time is limited only by the amount of available Windows memory.
While most of the menu commands are common to many text editors, the "Tools" menu is useful for a CNC programmer to simplify tasks such as scaling, mirroring and renumbering blocks of code. Syntax colouring of text helps make the code easier to read, as does the ability to quickly insert spaces before words. The spaces can also be quickly removed so as to shrink the size of large files.
The ability to open multiple documents at one time enables the user to copy text from one file to another, merge files into one, or just look up an older program to help get the code format for a particular application.
In this manual the terms "document", "file", and "text file" refer to the text files that contain the CNC program.
DISCLAIMER:
The producers of this software have no control over how the software is used, how the user writes CNC programs or sets up the CNC machines; therefore we take no responsibility for any damage or injury caused by files written or edited with this software.
As the user has twenty one days to try this software with the full function demo version, warranty is limited to replacement of defective product.
For more information, to report bugs, or to make suggestions please see our website at www.aggsoft.com, or email support page.
Company home page: https://www.aggsoft.com/
Software home page: https://www.cnc-syntax-editor.com/
Serial port hardware reference: https://www.aggsoft.com/rs232-pinout-cable/
Glossary
Baud Rate - The transmission speed of data through an asynchronous channel. Often confused with BPS (bits per second), baud rate actually refers to the number of signals per second. Because each signal can represent more than one bit of data, the number of bits per second is usually higher than the baud rate. For example, 2400 bps is typically sent at a rate of 600 baud.
Binary File - A file that contains data or program instructions written in ASCII and extended ASCII characters.
ASCII - An acronym for American Standard Code for Information Interchange. ASCII files are plain, unformatted text files that are understood by virtually any computer. Windows Notepad and virtually any word processor can read and create ASCII files. ASCII files usually have the extension .TXT (e.g., README.TXT).
Bytes - A collection of eight bits that represent a character, letter or punctuation mark.
COM port - Short for a serial communication port. Most DNC software communicate with a computer through a communication port, and most IBM and IBM-compatible computers support up to four serial ports COM1, COM2, COM3 and COM4. Additional ports can be added by adding additional hardware.
CNC - Computerized Numerical Control Refers to machine tools that have a computer and memory to control their operation. Most all non manual machine tools sold today will be CNC. see also NC.
Data bits - A group of bits (1's and 0's) that represent a single character or byte. Typically, there are seven or eight data bits. During an asynchronous communication (e.g., BitCom connecting to CompuServe), each side must agree on the number of data bits. Data bits are preceded by a start bit and followed by an optional parity bit and one or more stop bits.
DNC – Acronym that can mean Distributed Numerical Control or Direct Numerical Control depending upon the application. In the beginning DNC stood for Direct Numerical Control. A computer provided machine instructions for a NC milling machine that were transmitted over telephone lines. Later the term DNC evolved to mean a system where a group of CNC machines are linked to a central computer. Or conversely a combination of computers are each linked to one or more CNC machines and the computers are linked together by way of a local area network. Distributed Numerical Control where by NC programs are sent (distributed) to the memory of a CNC machine. The program is then run from the CNC memory.
Flow control - A method of controlling the amount of data that two devices exchange. In data communications, flow control prevents one modem from "flooding" the other with data. If data comes in faster than it can be processed, the receiving side stores the data in a buffer. When the buffer is nearly full, the receiving side signals the sending side to stop until the buffer has space again. Between hardware (such as your modem and your computer), hardware flow control is used; between modems, software flow control is used.
Handshaking - Is the way in which the data flow between computers/hardware is regulated and controlled. Two distinct kinds of handshaking are described: Software Handshaking and Hardware Handshaking. An important distinction between the kinds of signals of the interface is between data signals and control signals. Data signals are simply the pins which actually transmit and receive the characters, while control signals are everything else.
NC - Numerical Control The operation of a machine by a series of coded instruction's that consist of numbers and letters of the alphabet and other symbols. These are translated into pulses of electrical current or other output signals that active motors and other device to run the machine. On early NC machines these signals was often delivered to the machines by using punched tape. Also, the term NC machine refers to machine tools that do not have a computer and memory installed. see also CNC.
NC File – a file containing one or more programs in the special language for Numeric Control machines.
NC Program – a set of instructions written in the machine language and saved to an NC file.
Parity - In data communications, parity is a simple procedure of checking the integrity of transmitted data. The most common type of parity is Even, in which the number of 1's in a byte of data add up to an even number, and None, in which a parity bit is not added.
PC - abbreviation for a Personal Computer.
Punch - CNC output device - used in CNC machines to output programs to perforated tape. Units can be parallel to tape punch or serial output.
RS232, RS423, RS422 AND RS485 - The Electronics Industry Association (EIA) has produced standards for RS232, RS423, RS422, and RS485 that deal with data communications. EIA standards where previously marked with the prefix "RS" to indicate the recommended standard. Presently, the standards are now generally indicated as "EIA" standards to identify the standards organization.
Electronic data communications will generally fall into two broad categories: single-ended and differential. RS232 (single-ended) was introduced in 1962. RS232 has remained widely used, especially with CNC control builders. The specification allows for data transmission from one transmitter to one receiver at relatively slow data rates (up to 20K bits/second) and short distances (up to 50' @ the maximum data rate). This 50' limitation can usually be exceeded to distances of 200' or more by using low capacitance cable and keeping the data rates down to 9600 baud and lower.
RTS/CTS Hardware handshaking - uses additional wires to tell a sending device when to stop or start sending data. DTR and RTS refer to these Hardware handshaking lines. you can select whether you need to use DTR or RTS individually, or use both lines for hardware handshaking. See also Xon/Xoff.
Stop bits - In data communication, one or two bits used to mark the end of a byte (or character). At least one stop bit is always sent.
Upload - To send one or more files from your computer's disk storage to a remote computer. In DNC this usually means from the CNC machine's control back to the DNC computer. This can also mean from your computer's disk to a remote computer, such as another PC or an online service or the internet.
System requirements
Windows 2000 Professional - Windows 10 (2019), including x64 and x86 OS, Workstation, and Server OS.
It is necessary to have at least one free COM port, not busy by any device (mouse, for example) to connect an external device.
Installation process
If any beta-version was installed on your computer, remove it.
Quit of the working CNC Syntax Editor on installation time.
Run an installation file.
By default, the installation wizard installs CNC Syntax Editor in the "C:\Programs Files\CNC Syntax Editor" or "C:\Programs Files (x86)\CNC Syntax Editor" directory of your system disk, but you can change this path.
In the standard distributive of CNC Syntax Editor are no additional modules files, which you can download from our site.
Introduction
Highlights
•Customizable Syntax Highlighting;
•Customizable code snippets;
•Search and Replace feature;
•Can upload programs to a NC with help of DNC Precision;
•Super comfortable editor with savable bookmarks;
•CNC specific tools: scaling, mirroring, lines numbering etc.
•Windows XP-styled interface;
•MDI interface that supports multiple windows;
•Windows/Unix/Mac line endings support.
Once the program is launched, the main program window is opened (fig.1). It is the editor environment. This image below shows the CNC Syntax Editor screen with its various parts labeled.
1. Menu bar - Menus are described in the Menus section of this help file;
2. Editor toolbar - contains button for quick access to the editor functions;
3. Tools toolbar - contains button for quick access to the set of CNC programer's tools;
4. Editor window - the place for editing your programs. A Title bar of this window shows the file name of documents opened. If your document is modified, then title bar contains the "*" character after a file name;
6. Editor popup menu - сlick the right mouse button after text selection to acces this menu. This menu is same as Edit sub-menu of the main menu;
7. Task bar - shows file names of all documents opened. You can switch between documents by clicking a button on the task bar;
8. Status bar - shows current status of the CNC Syntax Editor and other information such as:
• Shows a short description of highlighted menu items.
• Line No: Shows line and column numbers of insertion point.
• CAP: Indicates that the Caps Lock key is on -- otherwise blank.
• NUM: Indicates that the Num Lock key is on -- otherwise blank.
• OVR: Indicates that the text being entered will overwrite existing text rather than being inserted. This is toggled on and off with the Insert key.
9. Gutter - displays editor lines numbering and uses for bookmarks and full line selection, described in the Edit menu section.
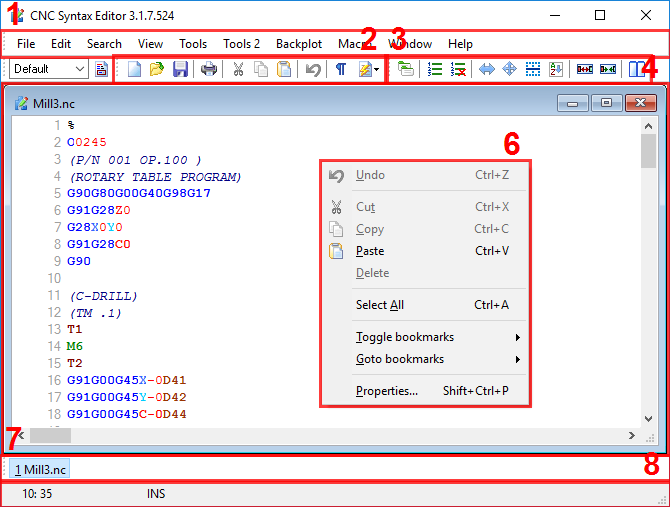
Fig.1 The main program window
Most CNC Syntax Editor menus have built-in hints. For example, when you move your mouse over a menu item, the hint is displayed on the status bar as shown on the screen shot.
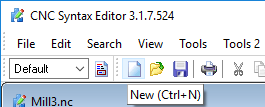
Fig.2 Hint window
Configuring properties
Click the "Edit → Properties..." menu to open the Properties dialog (Fig.1)
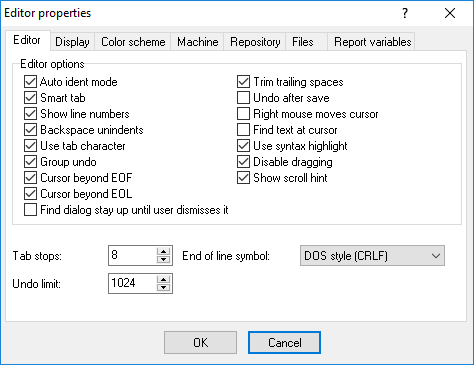
Fig.1. Options window. The "General" tab
Here you can customize appearance and behavior or the editor, colors of the syntax highlighting, enable or disable certain options etc.
Use tabs of the Options dialog box to customize the behavior of the editor.
General tab
Use the following editor options to control text handling in the editor. Check the option to enable it.
Auto indent mode - Positions the cursor under the first nonblank character of the preceding nonblank line when you press Enter.
Smart tab - Tabs to the first non-whitespace character in the preceding line. If Use Tab Character is enabled, this option is off.
Show line numbers - Show line numbers on the gutter. It's text lines numbering, not program numbering.
Backspace unindents - Aligns the insertion point to the previous indentation level (outdents it) when you press Backspace, if the cursor is on the first nonblank character of a line.
Use tab character - Inserts tab character. If disabled, inserts space characters. If Smart Tab is enabled, this option is off.
Group undo - Undoes your last editing command as well as any subsequent editing commands of the same type, if you press Alt+Backspace or choose Edit|Undo.
Cursor beyond EOF - Positions the cursor beyond the end-of-file character.
Cursor beyond EOL - Selection Beyond EOL.
Trim rrailing blanks - Trim any blanks you might have at the end of a line.
Undo after save - enable/disable undo function after saving a program.
Right mouse click moves cursor - if you'll click right mouse button, then the editor cursor will move to a specified position.
Find text at cursor - Places the text at the cursor into the Text To Find list box in the Find Text dialog box when you choose Search|Find. When this option is disabled you must type in the search text, unless the Text To Find list box is blank, in which case the editor still inserts the text at the cursor.
Use syntax highlighting - Enables syntax highlighting. To set highlighting options, use the "Color scheme" page.
Disable dragging - Use the Key Mappings Options to specify key mapping modules and to enable or disable enhancement modules including what order to initialize them.
Show scroll hint - Use a hint over the scroll box while scrolling, which will display top line number.
Other options (when selected)
Tab stops - Set the character columns that the cursor will move to each time you press Tab. If each successive tab stop is not larger than its predecessor, you will receive an error.
Undo limit - undo function can store specified number of last changes only.
End of line symbol - Specify the type of line ending characters. CNC Syntax Editor will save all files with these character.
Display tab
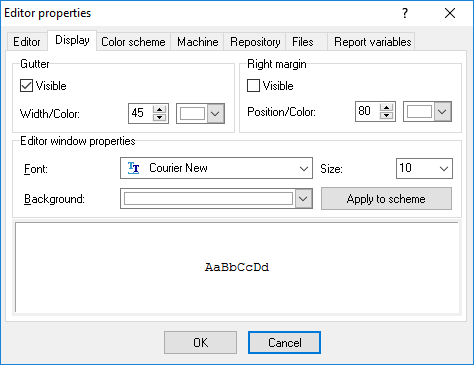
Fig.2. Options window. The "Display" tab
Margin and gutter
Visible gutter - enable/disable visibility of the gutter at the left of an editor window.
Gutter color - guttor background color.
Margin position - maximum line length (in characters) at the right of an editor window.
Margin color - color of the margin.
Editor font/Editor font size - font type and font size of an editor window.
Editor color - an editor window background color.
Color scheme
Use the Color page of the Editor Options dialog box to specify how the different elements of your code appear in the editor (fig.3).
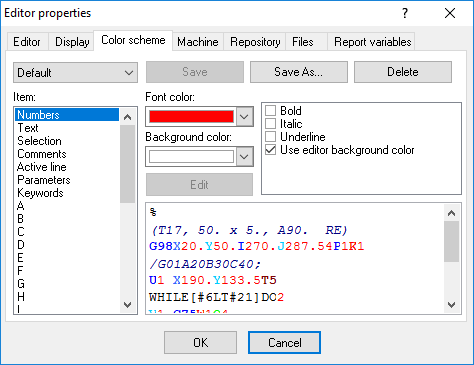
Fig.3. Options window. The "Color scheme" tab
You can specify foreground and background colors for anything listed in the "Item" list box. The sample editor shows how your settings will appear in the editor.
Scheme - Enables you to quickly configure the editor display using predefined color combinations. The sample code shows how your settings will appear in the editor.
!Default! - Displays reserved words in bold. Background is white. You can't delete this scheme.
Classic - Displays reserved words in white and code in yellow. Background is dark blue.
Twilight - Displays reserved words in light blue and code in white. Background is black.
Highlight - Same as default scheme. Displays reserved words in light blue and code in white. Background is white.
Item
Specifies syntax highlighting for a particular code element. You can choose from the Item list box or click the element in the sample editor.
The element options are:
Command - any G code;
Comment - any string in ( );
Identifier - tool or tool selecting parameters etc;
Number - any digits with dot;
Parameter - any coordinates symbol after G code;
Reserved word - other characters (not numbers) after G code;
Sign - + or - before numbers;
Space - spaces between elements;
Unknown symbols - all others characters
As you change highlighting on various language elements, you can see the effect in the editor labeled Syntax Highlighting.
Foreground/Background Color - Sets the foreground and background colors for the selected code element. The foreground color changes automatically for each element you choose in the Item list box. It is not recommended to choose the same color for the foreground and the background, as you will be unable to read any text.
Text attributes - Specifies format attributes for the code element. The attribute options are: Bold, Italic, Underline.
Use the !default! scheme for:
•Displays the code element using default system colors for the foreground, background, or both.
•Unchecking either option restores the previously selected color or, if no color has been previously selected, sets the code element to the system color.
Note: To change the Windows system colors, use the Windows Control Panel.
Introduction
The menus of CNC Syntax Editor are located on the menu bar, which you can move at any position of the screen. The sub-menus of the main menu are File, Edit, Search, View, Tools, Window and Help. Each item in these menus is described in this section below. Some menu functions are also activated by pressing combinations of keys on the keyboard (called "Hotkeys" in this Help file), or by buttons on the toolbar. The Toolbar is located below the menu bar by default and you can move toolbar too.
Another way to access some edit menu functions is to click the right button of the mouse. See the help paragraphs on each function for more information. Hotkeys are described thus: "Ctrl+N" means that the user holds the Ctrl key down while simultaneously pressing the N key. The appropriate keyboard shortcuts and toolbar buttons are shown with each menu item.
Key mapping
Keystroke Action
UP Cursor Up
DOWN Cursor Down
LEFT Cursor Left
RIGHT Cursor Right
PAGE UP Page Up
PAGE DOWN Page Down
DELETE Delete Char Right
BACK Delete Char Left
Shift + BACK Delete Char Left
Shift + ENTER Enter
ENTER ENTER
TAB Tab
Ctrl + LEFT Jump Word Left
Ctrl + RIGHT Jump Word Right
Shift + DOWN Mark Down
Shift + UP Mark Up
Shift + LEFT Mark Left
Shift + RIGHT Mark Right
Shift + HOME Mark To Line Begin
Shift + END Mark To Line End
Shift + PAGE UP Mark Page Up
Shift + PAGE DOWN Mark Page Down
Ctrl + C Copy To Clipboard
Ctrl + X Cut To Clipboard
Ctrl + V Paste From Clipboard
Ctrl + Z Undo
Shift + Z Redo
Ctrl + F Show Search Dialog
Ctrl + R Show Replace Dialog
F3 Key Find Next
Ctrl + E Key Find Next
Ctrl + L Key Find Next
Ctrl + Y Delete Line
Ctrl + Shift + Y Delete To Line End
Ctrl + T Delete Word Right
Ctrl + N Insert Line
Ctrl + I Press Tab
Ctrl + A Select All
Shift + I Indent Block
Shift + U Outdent Block
Ctrl + Home Jump To File Begin
Ctrl + End Jump To File End
Ctrl + Down Scroll Down
Ctrl + Up Scroll Up
File menu
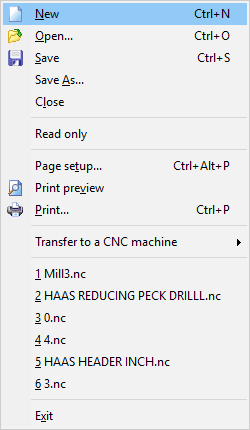
Fig.1. The file menu
New
Hotkey: Ctrl+N
This is used to create a new file. Once the file is created, it is automatically named "NoName1.ncp". As each new document is opened, the number in the title will increase: "NoName2.ncp", "NoName3.ncp", etc. Since CNC Syntax Editor is a multi-document editor, open documents will not be closed when a new one is opened.
Open
Hotkey: Ctrl+O
This will open an existing file. You will be asked for the file location. The file may take a short while to load. The default folder is the folder where CNC Syntax Editor had been installed.
Save
Hotkey: Ctrl+S
This saves the currently opened file in its current location. If the file is a new file, a dialog box appears allowing the user to choose a drive, folder and filename. This menu command only appears when there is one or more files opened.
Save as
This will save the currently opened file to a new location which you specify. This command only appears when there is a text file or files open.
Close
This will close the currently opened file. If file had been modified, then CNC Syntax Editor will ask you about saving.
Hotkey: Ctrl+P
Choose a printer if more than one is available, and set its options. If you'll click a button on the toolbar, then CNC Syntax Editor prints the active document to the default printer without dialog
Page Setup
Allows the user to set options for printing the file. Paper size and orientation are set with the Print setup (fig.2).
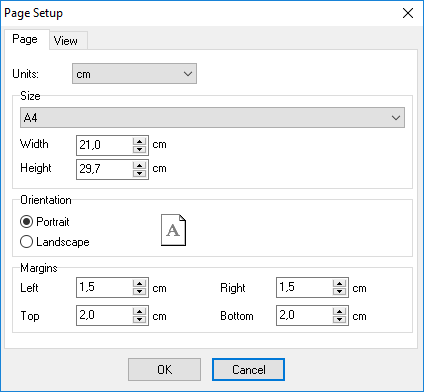
Fig.2. The page setup
•Units - measure units of margins;
•Margins frame - sets the white space between the text and the page edges;
•Mirror margins - Set if margins should be mirrored (i.e. when printing 2-sided);
•Line numbers - Print line numbers;
•Print line numbers in margin - If this options is enabled then line numbers are printed in the left margin, otherwise left margin is increased by width of line number text;
•Syntax print - Highlight text;
•Use colors - Print in colors. Colours printed will depend upon the setup of your computer and printer;
•Wrap lines - Wrap text to margins.
CNC Syntax Editor uses the DNC Precision software by AGG Software for uploading files to a CNC machine. Please, refer DNC Precision manul for machines configuration.
Recent File List
This part of the File Menu, between Print Setup and Exit, is a list of recently opened documents. Clicking on one of these file names will open that document for editing
Exit
Closes CNC Syntax Editor and all open files. The user is given the opportunity to save any modified documents.
Edit menu
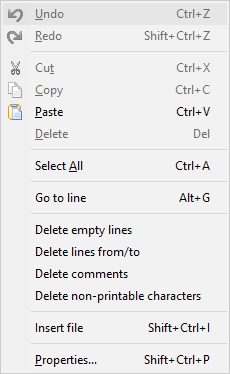
Fig.1. The Edit menu
Hotkey: Ctrl+Z
Right-click menu
Choose Undo in the editor to undo your most recent keystrokes or some mouse actions.
Using Undo in the editor
Undo can reinsert any characters you delete, delete any characters you insert, replace any characters you overwrite, or move your cursor back to its prior position. You can undo multiple successive actions by choosing Undo repeatedly. This removes your changes by "stepping back" through your actions and reverting to their previous state.
To specify an undo limit:
1. Choose Edit→Properties, and click the General page.
2. In the Undo limit box, enter a number to represent the maximum number of undos you want.
Note: You can undo an editing change after you save only if you check the Undo after save check box on the General tab.
If you undo a block operation, your file appears as it was before you executed the block operation.
Note: The Undo command does not change an option setting that affects more than one window.
Hotkey: Shift+Ctrl+Z
Choose Edit→Redo to reverse the effects of your most recent Undo. Redo has an effect only immediately after an Undo command.
Hotkey: Ctrl+X
Right-click menu
Choose Edit→Cut to remove the selected text from the editor from their current position and place them on the clipboard. Cut replaces the current clipboard contents with the selected item. To insert the contents of the clipboard elsewhere, choose Edit→Paste. If you wish to use the Right-click menu for this function, move the mouse arrow on to the selected text, then click the right button of the mouse.
Hotkey: Ctrl+C
Right Click menu
Choose Edit→Copy (or right-click in the editor and choose Copy) to place an exact copy of the selected text, component, or menu on the clipboard and leave the original untouched. Copy replaces the current clipboard contents with the selected text. To insert the contents of the clipboard elsewhere, choose Edit→Paste.
Hotkey: Ctrl+V
Right Click menu
Choose Edit→Paste to insert the contents of the clipboard into the active editor page.
Note: You can paste only text into the editor window.
When pasting into the editor window, the text is inserted at the current cursor position. You can also right-click in the editor and choose Paste from the context menu. You can paste the current contents of the clipboard as many times as you like until you cut or copy a new item onto the clipboard.
Delete key.
Right Click menu
Choose Edit→Delete to remove the selected text or component without placing a copy on the clipboard. Even though you cannot paste the deleted item, you can restore it by immediately choosing Edit→Undo.
Delete is useful if you want to remove an item but you do not want to overwrite the contents of the clipboard. If you wish to use the Right-click menu for this function, move the mouse arrow on to the selected text, then click the right button of the mouse.
Hotkey: Ctrl+A
Сhoose Edit→Select All to select all the text in the currently displayed file.
Hotkey: Alt+G
This command allows to goto any line number. Сhoose Edit→Goto line and type a line number in the dialog box.
This will remove (delete) empty (without any text) lines from your file. You can restore it by immediately choosing Edit→Undo.
This will remove (delete) the specified range of lines lines from your file. When you click this menu item the dialog window will appear, which ask your about lines range. You can restore it by immediately choosing Edit→Undo.
This will remove (delete) comments in () from your file, reducing file size. You can restore it by immediately choosing Edit→Undo.
Delete non-printable characters
This will remove (delete) all characters with a decimal code from 0 to 32 and from 128 to 255 from your file. You can restore it by immediately choosing Edit→Undo.
Choose Edit→Insert file to insert the contents of a file into the active editor page. When you'll select this menu item then the dialog window will appear, when you should select a file name for inserting.
When inserting into the editor window, the text is inserted at the current cursor position. You can restore it by immediately choosing Edit→Undo.
This will open properties dialog window.
Search menu
Hotkey: Ctrl+F
Choose Search→Find to display the Find Text dialog box (fig.1)
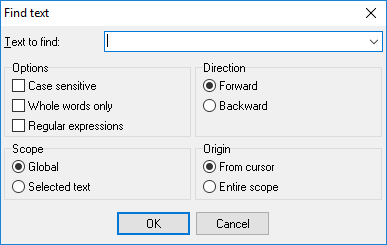
Fig.1 Find text dialog box
Find Text dialog box
Here you may specify text you want to locate and to set options that affect the search. Find locates the line of code containing the first occurrence of the string and highlights it.
Dialog box options
Text to find - Enter a search string or click the down arrow next to the input box to select from a list of previously entered search strings.
Options - Specified attributes for the search string
•Case sensitive - Differentiates uppercase from lowercase when performing a search;
•Whole words only - Searches for words only. (With this option off, the search string might be found within longer words.).
Direction - Direction to search, starting from the current cursor position
•Forward - From the current position to the end of the file. Forward is the default;
•Backward - From the current position to the beginning of the file.
Scope - How much of the file is searched
•Global - Searches the entire file in the direction specified by the Direction setting. Global is the default scope.
•Selected text - Searches only the selected text in the direction specified by the Direction setting. You can use the mouse or block commands to select a block of text.
Origin - Where the search starts
•From cursor - The search starts at the cursor's current position, and then proceeds either forward to the end of the scope, or backward to the beginning of the scope depending on the Direction setting. From cursor is the default Origin setting.
•Entire scope - The search covers either the entire block of selected text or the entire file (no matter where the cursor is in the file), depending upon the Scope options.
Hotkey: F3
Repeat the last search using the same options.
Hotkey: Ctrl+R
Choose Search→Replace to display the Replace Text dialog box (fig.2)
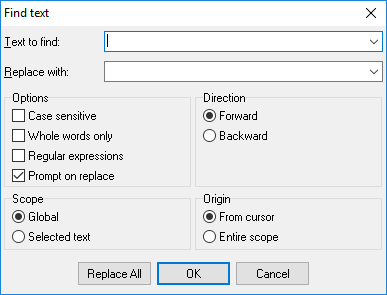
Fig.2 Replace text dialog box
Replace Text dialog box
Use this dialog box to specify text you want to search for and then replace with other text (or with nothing). Most components of the Replace Text dialog box are identical to those in the Find Text dialog box.
Text to find - Enter a search string. To select from a list of previously entered search strings, click the down arrow next to the input box.
Replace with - Enter the replacement string. To select from a list of previously entered search strings, click the down arrow next to the input box. To replace the text with nothing, leave this input box blank.
Prompt on replace - Prompts you before replacing each occurrence of the search string. When Prompt on replace is off, the Code editor automatically replaces the search string.
Replace All - Click Replace All to replace every occurrence of the search string. If you check Prompt on replace, the Confirm dialog box appears on each occurrence of the search string.
Hotkey: Ctrl+T
From the Search menu select Next tool change. The file will be scanned forwards for a tool change (M06), and the cursor will be re-positioned at that line.
Hotkey: Ctrl+Shift+T
From the Search menu select Next tool change. The file will be scanned backwards for a tool change (M06), and the cursor will be re-positioned at that line.
Bookmarks
Toggle bookmarks
Right Click Menu
Hotkeys:
Shift+Ctrl+0 - Sets/replaces bookmark 0
Shift+Ctrl+1 Sets/replaces bookmark 1
Shift+Ctrl+2 - Sets/replaces bookmark 2
Shift+Ctrl+3 - Sets/replaces bookmark 3
Shift+Ctrl+4 - Sets/replaces bookmark 4
Shift+Ctrl+5 - Sets/replaces bookmark 5
Shift+Ctrl+6 - Sets/replaces bookmark 6
Shift+Ctrl+7 - Sets/replaces bookmark 7
Shift+Ctrl+8 - Sets/replaces bookmark 8
Shift+Ctrl+9 - Sets/replaces bookmark 9
This command places a mark beside the line holding the cursor. The mark is visible as a rectangle with number on the gutter. If the line is already marked, "Toggle Bookmark" removes the bookmark.
Go to bookmarks
Right Click Menu
Hotkeys:
Ctrl+0 - Goes to bookmark 0
Ctrl+1 - Goes to bookmark 1
Ctrl+2 - Goes to bookmark 2
Ctrl+3 - Goes to bookmark 3
Ctrl+4 - Goes to bookmark 4
Ctrl+5 - Goes to bookmark 5
Ctrl+6 - Goes to bookmark 6
Ctrl+7 - Goes to bookmark 7
Ctrl+8 - Goes to bookmark 8
Ctrl+9 - Goes to bookmark 9
Moves the cursor position in the editor window to a bookmark.
View menu
Use the View menu commands to display or hide different elements of the environment and open windows that belong to the editor environment.
Non printable symbols - show/hide all characters with a code < 32 (Dec). Tabs, line feed etc.
Separate commands - this options enables visual splitting of NC commands in a line.
Choose View→Toolbars to show or hide the following in the editor environment:
•Standard - New, Open, Save, Save All, Open Project, Add file to Project, Remove file from project;
•Tools - Code repository, Lines numbering, Shift, Scale, Mirror, Exchange axes, Add and Remove spaces;
•Task bar - this bar displays titles of all documents opened in the editor environment;
•Status bar - this bar displays status of the editor environment.
Check the items you want to display and uncheck those you want to hide. The toolbars provide icons as shortcuts for actions you can perform.
Locked scrolling - you can open two windows and enable this options. In this case if you'll scroll first window, then second window will be scrolled too and vice versa.
Code repository
The Code repository (Tools→Code repository) (fig.1) provides templates for new projects and blocks of a most uses code. The Repository is maintained in Repository directory (under directory, where CNC Syntax Editor had been installed), that contains a files with all items in the Repository. It is not designed to save large files, but segments of code up to 16 KB.

Fig.1 Code repository dialog box
Choose Tools→Repository or click on the Code repository button ![]() to display the Object Repository dialog box.
to display the Object Repository dialog box.
Items description
1. Sorting tool bar - allows you to select a sort order of the item list #5.
2. Buttons toolbar - contains buttons for quick access to repository functions:
•![]() Previous - select previous item in the item list;
Previous - select previous item in the item list;
•![]() Next - select next item in the item list;
Next - select next item in the item list;
•![]() New - adds new item into the item list. After a click on the button CNC Syntax Editor will add new item to the list and will allow you to change an item description. For changing the item description you should click an item name twice (click-pause-click);
New - adds new item into the item list. After a click on the button CNC Syntax Editor will add new item to the list and will allow you to change an item description. For changing the item description you should click an item name twice (click-pause-click);
•![]() Save - saves modified item;
Save - saves modified item;
•![]() Delete - deletes current selected item;
Delete - deletes current selected item;
•![]() Copy - copy a content of the current item to the clipboard;
Copy - copy a content of the current item to the clipboard;
•![]() Paste - paste content of the clipboard to the repository window.
Paste - paste content of the clipboard to the repository window.
Search toolbar - allows you search a text within all item in the item list. Type any text and click the Search ![]() button. CNC Syntax Editor will try to find an occurrence of searching text. Click the Search button again for searching a next occurrence. You can use wildcard characters ? and * while searching, where ? is any one character and * is a group of one or more characters.
button. CNC Syntax Editor will try to find an occurrence of searching text. Click the Search button again for searching a next occurrence. You can use wildcard characters ? and * while searching, where ? is any one character and * is a group of one or more characters.
3. The Repository editor window - here you can see or edit your repository items. The Repository editor window uses same syntax and editing options as other editor windows;
4. The item list - this list contains names of all items in the Repository. Click any item in the list for selecting the item and load their content to the Repository editor.
Adding a new code item:
1. Click the New button to add new item into the Repository;
2. Type your item name;
2. Type or paste your code into the Repository editor window;
4. Click the Save button.
Inserting a code item into a CNC file:
1. Click the name of the code item in the item list;
2. Click the Copy button;
3. Minimize or close Code Store;
4. Press Ctrl+V, click a toolbar button or right-click the mouse and select the Paste menu ite.
Removing a code item:
Click the name of the item in the item list and click the Delete button.
Searching all code items for a text:
1. Type your text;
2. Click the Search button.
Interface > Tools Menu > Lines numbering
Renumber lines
This feature will add or remove the line numbers. Standard CNC line numbers with the format of Nnnnn are used. When adding (numbering) the lines you have the choice of numbering each line with its true line number, or to start the count at a certain number and increment by another number. To add the line numbers click "Renumber lines". A dialog window will appear (fig.1).
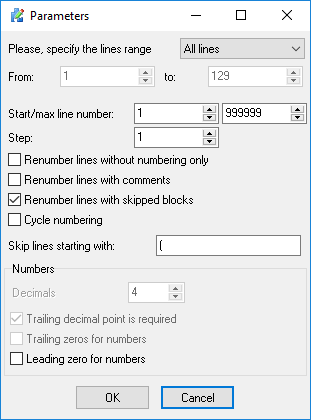
Fig.1 Renumber lines dialog box
This dialog allows the user to choose the section of code to process. The defaults are "First linse" and "Last line" of a file. To change these numbers, click the check box and enter the required line number into the window. Please note that the line numbers in this box are not block numbers (Nnnnn), but are document line numbers.
The Status Bar shows the document number of the line where the cusor is located. The section of the file to be processed may also be chosen by selection.
Start line number - It's the number that will begin the sequence on "First Line". Integer numbers only can be entered.
Step - Enter the increment amount. Integer numbers only.
Renumber lines without numbering only - Checking this box will add a block number to a line of code that is currently without numbering. Lines beginning with N,O,P, and any non-alpha character will be ignored.
Leading zero for numbers - CNC Syntax Editor will add leading zero for lines. For example: last line number is 9999 and first line number if 10, then CNC Syntax Editor will add the following text to the first line: N0010.
Remove line numbers
Removes all block numbers from the current file.
Shift/Scale/Mirror
This command allows the user to add or subtract an amount to/from selected axis (address) value from a part of the file or whole file. Use the "Shift value" dialog box to select the part of the file for processing. (fig.1).
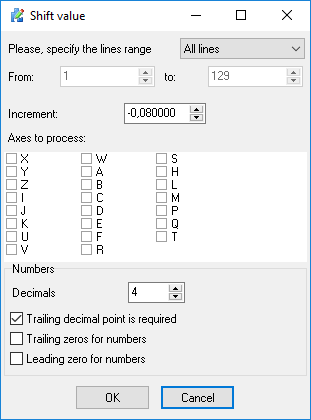
Fig.1 Shift value dialog box
Check the axis (addresse) to be processed and enter a positive or negative amount in the "Increment" field. Then click "OK" button.
Before processing a file the CNC Syntax Editor will offer you to create a backup copy of the current file.
Use this dialog box to specify a scale value and one or more code addresses by a specific factor. An ideal use for this command is to convert programs from inch to metric, and vise versa. Most components of the Scale dialog box are identical to those in the Shift dialog box.
Factor - scaling value.
Mirror changes all incidences of one or more code values from positive to negative, and vise versa. An option to change arc cutting direction and tool radius compensation direction is provided. Most components of the Mirror dialog box are identical to those in the Shift dialog box. When "Mirror" is selected, you may change the arc cutting direction by checking the "G02<-→G03" checkbox, and switch cutter diameter compensation between right and left by checking the "G41<-→G42" checkbox.
Note:
•All of the above commands may by processed throughout all of the file, or a specified part of the file by using the "From" and "To" fields.
•Before processing a file the CNC Syntax Editor will offer you to create a backup copy of the current file.
Exchange axes
This function allows the user to exchange the values of one coordinate address to another (fig.1). Most components of the Exchange axes dialog box are identical to those in the Shift dialog box.
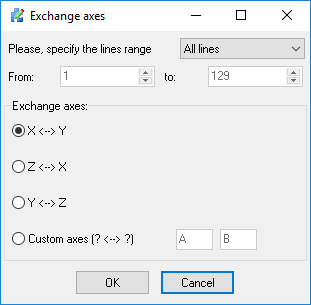
Fig.1 Exchange axes dialog box
Choose the axes you wish to exchange from the "Exchange axes", and click "OK". All of the incidences of the first address in a line will be changed to the second, and vise versa. You can exchange values between any axes. Just select "Custom axes" item from the "Exchange axes" group and type type your axes names.
Note:
•All of the above commands may by processed throughout all of the file, or a specified part of the file by using the "From" and "To" fields.
•Before processing a file the CNC Syntax Editor will offer you to create a backup copy of the current file.
Add and remove spaces
This feature can either insert spaces into your file to make it easier to read, or it can remove spaces from your file to save file space. "Add Spaces" will add a space before every letter after G code. "Remove Spaces" will simply remove every space in the file. You can add spaces on screen only. Use the Separate commands options.
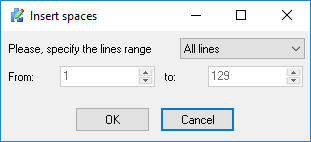
Fig.1 Add and remove spaces dialog box
Note:
•All of the above commands may by processed throughout all of the file, or a specified part of the file by using the "From" and "To" fields.
•Before processing a file the CNC Syntax Editor will offer you to create a backup copy of the current file.
Compare file with WinDiff
WinDiff is a File Compare application that is provided by Microsoft. WinDiff has its own Help, however, the following instructions will get you started.
When you choose WinDiff from the Tools menu, the Open file dialog appears. Enter the names of the files you wish to compare, or use the browse button to search through your folders, or choose from recently compared files by using the down arrow button.
Change characters case
Uppercase
From the Tools2 menu select Uppercase. The all characters in the file will be converted to uppercase.
Lowercase
From the Tools2 menu select Lowercase. The all characters in the file will be converted to lowercase.
Adjusting spindle speed and feed rate
Adjust spindle speed
The Adjust spindle speed command is used to quickly change the spindle speeds in a CNC Program. If text is selected, it will add change the spindle speeds in the selected text. If no text is selected, the command will change the spindle speeds of either the entire file or the current line, depending on the user's preference. To change spindle speeds specify following parameters:
New value - type a new spindle speed value as a specific percent (100% - current value)
Minimum - Specify a value to make sure spindle speeds don't go below a minimum value.
Maximum - Specify a value to make sure spindle speeds don't go above a maximum value.
Decimals - Specify number of decimals to the right of the decimal point into this field.
Adjust feed rate
The Adjust feed rate command is used to quickly change the feed rates in a CNC Program. If text is selected, it will add change the feed rates in the selected text. If no text is selected, the command will change the feed rates of either the entire file or the current line, depending on the user's preference. To change feed rates specify following parameters:
New value - type a new feed rate as a specific percent (100% - current value)
Minimum - Specify a value to make sure feed rates don't go below a minimum value.
Maximum - Specify a value to make sure feed rates don't go above a maximum value.
Decimals - Specify number of decimals to the right of the decimal point into this field.
Rotate
The Rotation function can be used to rotate all the coordinates in your file around a particular center point (fig.1) Rotation can occur in any plane (XY, XZ, or YZ) and can automatically sense the status of G90 and G91 in your program. When rotating in the XY plane, the X, Y values are rotated, and the Z value are not affected. Similarly, when rotating in the XZ plane, the X, Z values are rotated, and the Y value are not, (etc.). The program rotation function does not work for 3-axis circular moves (spherical interpolation) where all 3 axes are programmed in the same block. In this case, only the two axes selected are rotated, and the 3rd axis is not affected.

Fig.1 Rotate program
Axes to rotate - Select axes to rotate (XY, XY, XZ).
Angle - Enter the angle of rotation by degrees in this field.
Centre of rotation - Enter the co-ordinates of the center of the rotation in these axes (X - first axis, Y - second axis).
Decimals - Specify number of decimals to the right of the decimal point into this field.
Sense to G90/G91 - Check this field when the program should automatically sense the status of G90 and G91 in your program.
Find XYZ ranges
The Find XYZ ranges function will scan your program for the maximum and minimum values for each axis. This function does not change the contents of your text box, but only displays its maximum and minimum values. In addition to axis motions, such as X,Y, and Z, you can also see Max/Min values of spindle speeds and feed rates, ABC axes and total dimensions of your piece.
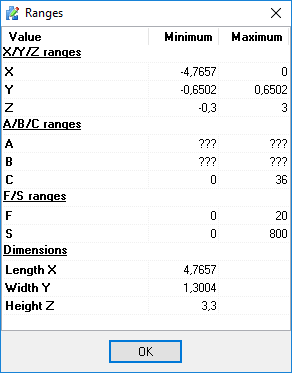
Fig.1 Find XYZ ranges
Windows menu
CNC Syntax Editor includes a Window menu item that contains Tile, Cascade, and Arrange Icons commands to offer users an easy way to arrange their open documents in the client area of the frame window.
Cascade
Arranges all open, non-minimized windows in a cascading stack. Click on the title bar of any window to make that window active and fully visible.
Tile orizontally or Vertically
Arranges all open, non-minimized windows so that an equal portion of each window is visible. When tiled horizontally, the windows are arranged up and down the screen. When tiled vertically, they are across the screen.
Arrange Icons
If you do not wish to include a window or windows in a tiled or cascaded arrangement, minimize that window and it will appear as an icon. This menu command arranges icons in rows at the bottom of the screen. These icons cannot be seen if any document window is maximized.
List of the open document windows
The Window menu item contains a list of the open document windows, which lets users quickly switch among them. (The window that currently has focus appears in the list with a check mark next to it.)